Dynamic Image content resizing with Lambda

I am a dedicated double certified AWS Engineer with 10 years of experience, deeply immersed in cloud technologies. My expertise lies in a broad array of AWS services, including EC2, ECS, RDS, and CloudFormation. I am adept at safeguarding cloud environments, facilitating migrations to Docker and ECS, and improving CI/CD workflows with Git and Bitbucket.
While my primary focus is on AWS and cloud system administration, I also have a history in software engineering, particularly in Javascript-based (Node.js, React) and SQL.
In my free time I like to employ no-code/low code tools to create AI driven automations on my self hosted home lab.
When should you read this guide
If:
You have a significant amount, possibly millions of images with various usage patterns that you serve to website guests
If these images are not static images, but dynamic, generated on the user request
If you care about load times/SEO impact and cost
You should not use this guide:
If you have a few static images that can be easily pre-sized to appropriate size
If you're unable to make front-end code changes in image fetching.
Introduction
When transferring images in web and mobile applications, it's common to face challenges with image size optimization, as images are often sent without proper resizing, causing long transfer times, especially when handling multiple images.
This is typically not a problem with static images that can be pre-sized to various resolutions. However, if your web app doesn't yet know which images it needs to render, this issue can become more significant.
This solution involves enabling any front-end to request images in various sizes. This would be determined by the visitor’s device resolution, allowing for the delivery of an image that is optimally sized for each specific device.
Let's do first 4 different images sizes, however it's up to you how many you pick:
Small
Medium
Large
Extra Large
Users can request the size most suitable for their needs. For instance, a mobile device might require a 'small' image, whereas a desktop could be better served with an 'extra large' one.
Each size category scales the original image as follows, while maintaining the aspect ratio for height:
Small: 150px width
Medium: 300px width
Large: 600px width
Extra Large: 1200px width
Again, these sizes can be different.
Avoiding exact measurements for each image, such as 500x300, is strategic. It prevents the creation of an excessive number of image sizes (we'll store them later on in S3), which would otherwise increase storage costs and potentially slow down network transfers.
AWS tech we'll use
S3 (static site, redirection rules, generic S3 knowledge)
Lambda function (node js, lambda layers)
API gateway (generic API gateway knowledge)
Npm, build node projects, etc.
Cloudfront (for caching images)
High level overview
There’re 3 players in this game.
1. S3 bucket (this stores the original images, and the resized images)
2. API gateway (this is used as an entry point for non-resized images)
3. Lambda function (this is used to resize images and redirect to the new image)
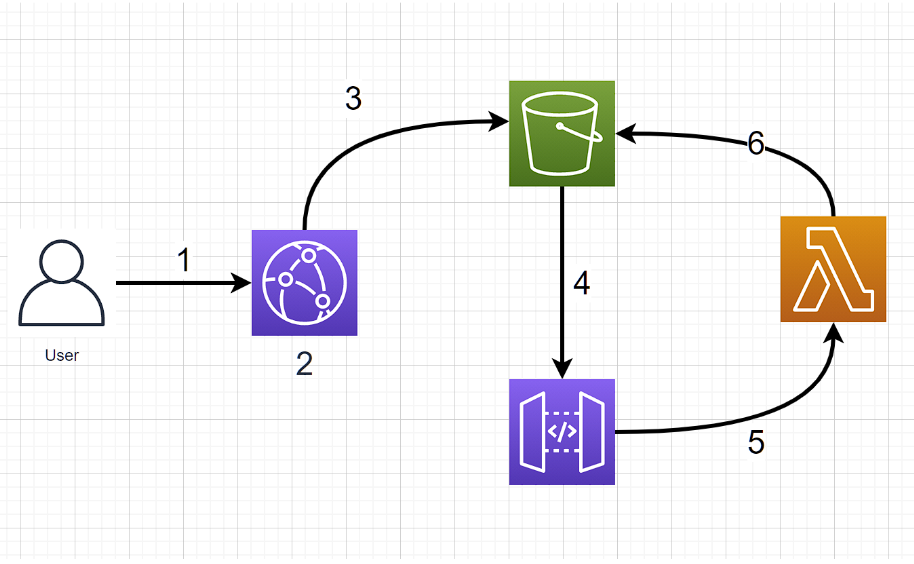
User requests image via Cloudfront URL. Something like
https://somethingsomething.cloudfront.net/small/img/catimage.pngCloudfront checks its own cache if it has the image. If yes, it serves it back to the user. In this case, the process stops.
If Cloudfront doesn't have it in its cache, it goes to S3 to retrieve the resized file. If S3 has the resized file, it returns it to Cloudfront, which caches it and returns it to the user.
If S3 also doesn't have the resized image, it results in a 404, and hence forwards the call to API gateway.
API gateway in return forwards the call to the Lambda function, which resizes the image
Lambda then places it in the S3 bucket and returns a new URL to the user.
As you see this would only need to execute once for each image. Any further calls would then get the resized image from Cloudfront.
The setup
Below you’ll find the steps to set up the solution.
I’ll not detail a generic S3, Lambda or API Gateway setup or permissions. There’re plenty of tutorials online. I’ll mention all the peculiarities though.
S3 initial setup
Set up an S3 bucket and dump some images on it
Set up public access to it
Set the permissions to allow public access (later on you can limit this to Cloudfront)
Enable static website hosting
At this point, you should be able to access all files in the bucket from anywhere.
Lambda + API gateway setup
create a function and attach a trigger to API gateway.
Leave the gateway open to public.
Set up Lambda permissions to S3 bucket
Here’s the policy I used (for logging and S3 PutObject)
{
    "Version": "2012-10-17",
    "Statement": [
        {
            "Effect": "Allow",
            "Action": [
                "logs:CreateLogGroup",
                "logs:CreateLogStream",
                "logs:PutLogEvents"
            ],
            "Resource": "arn:aws:logs:*:*:*"
        },
        {
            "Effect": "Allow",
            "Action": "s3:PutObject",
            "Resource": "arn:aws:s3:::img.yourbucket/*"
        }
    ]
}
4. Create a node project on your local PC and add an index.js file with these details. This is the code that does the resizing. Feel free to modify it as you wish. We'll upload this to Lambda.
'use strict';

const AWS = require('aws-sdk');
const S3 = new AWS.S3({
  signatureVersion: 'v4',
});
const Sharp = require('sharp');

const BUCKET = process.env.BUCKET;
const URL = process.env.URL;

exports.handler = function(event, context, callback) {
  const key = event.queryStringParameters.key;
  const match = key.match(/(small|medium|large|xlarge)\/(.*)\.(jpg|jpeg|png)/);

  const scale = match[1];
  const imageName = match[2];
  const imageExtension = match[3];
  const imagePath = imageName + '.' + imageExtension;

  const sizes = new Map();
  sizes.set('small', 150);
  sizes.set('medium', 300);
  sizes.set('large', 600);
  sizes.set('xlarge', 1200);

  const newSize = sizes.get(scale);
  let contentType;
  if  (["png"].includes(imageExtension.toLowerCase())) contentType = 'image/png';
  if  (["jpg", "jpeg"].includes(imageExtension.toLowerCase())) contentType = 'image/jpeg';


  S3.getObject({Bucket: BUCKET, Key: imagePath}).promise()
    .then(data => Sharp(data.Body)
      .resize({
        fit: Sharp.fit.contain,
        width: newSize
      })
      .toBuffer()
    )
    .then(buffer => S3.putObject({
        Body: buffer,
        Bucket: BUCKET,
        ContentType: contentType,
        Key: key,
      }).promise()
    )
    .then(() => callback(null, {
        statusCode: '301',
        headers: {'location': `${URL}/${key}`},
        body: '',
      })
    )
    .catch(err => callback(err))
}
Here’s the package.json.
{
  "name": "image-resize",
  "version": "1.0.0",
  "description": "Serverless image resizing",
  "readme": "Serverless image resizing",
  "main": "index.js",
  "scripts": {
    "build-copy": "npm install && mkdir -p nodejs && cp -r node_modules nodejs/ && zip -r  {file-name}.zip nodejs"
  },
  "devDependencies": {
    "aws-sdk": "^2.1046.0",
    "sharp": "^0.29.3"
  }
}
5. npm install --arch=x64 --platform=linux This will create a node_modules folder and a package lock file.
Because Sharp package has a different package for arch linux (which is used by lambda), you’d need to install this type. Please see here.
6. Create a nodejs folder and copy node_modules folder into it. Zip the whole nodejs folder
7. Create a new layer in lambda and upload this zip as your layer. This is needed, so you can separate your dependencies from your actual code.
8. Zip your package.json, your json lock and index.js. Upload this file as your code to Lambda
9. Attach the previously created layer to this code. This can be version one.
10. Add new environment variables. One for the bucket and one for the url path. See example below
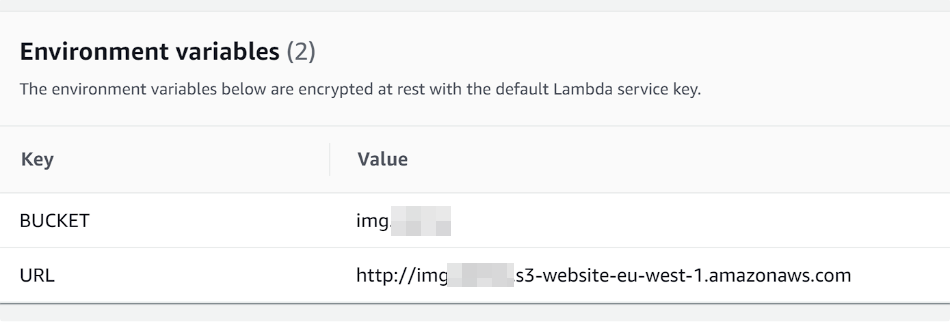
11. At this point your lambda function should work and you can test it by calling your API gateway EP. You can see your error logs for lambda in Cloudwatch.
The URL will be something like this: https://123456789.execute-api.us-west-1.amazonaws.com/default/image-resizer
Where /default/ is your stage you set and /image-resizer is your lambda function name.
Add redirection to S3 bucket
To have this all working together, you need to tell the S3 bucket to redirect calls that fail to retrieve any object.
Add a redirection rule to your static site settings:
[
    {
        "Condition": {
            "HttpErrorCodeReturnedEquals": "404"
        },
        "Redirect": {
            "HostName": "123456789.execute-api.eu-west-1.amazonaws.com",
            "HttpRedirectCode": "307",
            "Protocol": "https",
            "ReplaceKeyPrefixWith": "default/image-resizer?key="
        }
    }
]
Where HttpErrorCodeReturnedEquals is a condition that triggers when a 404 (not found) is returned from the bucket on a particular path.
HostName is your API gateway hostname
HttpRedirectCode is what you tell the user’s browser on the response (307 is temp. redirect)
Protocol is the secure http protocol
ReplaceKeyPrefixWith is used to replace incoming paths with other paths (along with KeyPrefixEquals tag in the condition block, which isn’t there now). In our case it simply adds the default/image-resizer?key= just after the domain name, making the rest of the path a query parameter instead, which we can parse in the Lambda function.
Add Cloudfront + HTTPS
Add a CloudFront distribution in front of your S3 bucket that contains the images. When you add your S3 bucket, make sure you don’t pre-select the bucket AWS offers you.
If you do so regardless, AWS will not use the static site endpoint (that has the redirection set up). The issue you’ll face will be a tricky one, as your available images will actually serve perfectly fine via Cloudfront, only the new (not yet resized) images will give “Access Denied” response. This response is actually quite misleading because when an object doesn’t exist on S3, you get this error from CloudFront.
So to avoid that, make sure you use the static site EP URL.
Additionally, change your lambda functions URL environment variable to point to Cloudfront instead of the S3 bucket. This will help your browser serve HTTPS images at all times (even on first call/cache)
This will have the following advantages:
it'll save your money using Cloudfront instead of S3
speed up network requests for users
Additional improvements to consider
Add Lifecycle rules for resized images only
This would be quite handy, as some images are only accessed once, and never again. Still, we’ll end up paying for the storage costs of those images. Deleting those images when not needed anymore would “free up space” on the bucket.
Reason why it’s recommended:
- not using an S3 bucket for storing an image that isn't used means saving money.
Add WEBP conversion (recommended, but later)
WebP is a modern image format designed for the web. It is both smaller than jpg and better quality.
(see: WebP Compression Study | Google for Developers )
Sharp gives you the option to convert images to WebP on the fly, further reducing the image size.
Reason why it’s recommended:
- smaller image size means smaller load times for users and faster pages
- extremely easy to implement and switch to webP at any time on our lambda function
- if you replace all your jpg and png with WebP, you'll save money on storage costs in S3