How to set up CI/CD pipeline on AWS using BitBucket, ECS, ECR
PART 1 - Environment Setup

I am a dedicated double certified AWS Engineer with 10 years of experience, deeply immersed in cloud technologies. My expertise lies in a broad array of AWS services, including EC2, ECS, RDS, and CloudFormation. I am adept at safeguarding cloud environments, facilitating migrations to Docker and ECS, and improving CI/CD workflows with Git and Bitbucket.
While my primary focus is on AWS and cloud system administration, I also have a history in software engineering, particularly in Javascript-based (Node.js, React) and SQL.
In my free time I like to employ no-code/low code tools to create AI driven automations on my self hosted home lab.
What you should already have
A bitbucket repository with existing SSH keys to connect to and 2FA enabled
An existing repository with some code to build
An ALB (Application Load balancer)
Your application dockerized
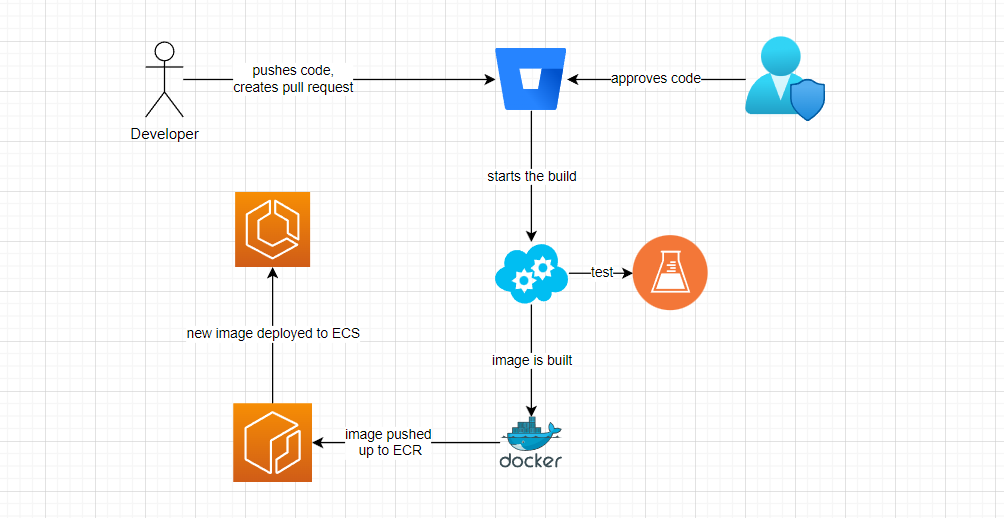
The simplified flow
Developer pushes up code to bitbucket on developer branch, then creates pull request to main branch
Somebody approves the pull request after reviewing code changes
Bitbucket triggers build on their server and tests are run
Docker image is is built and pushed up to ECR
Based on new image, ECS service is re-deployed
Things this guide will not cover
1. Changes to database schema on push
Sometimes a change is required in the database schema. This is generally more complex, depending on how the database is set up, if any ORM is in place, how the database differs between environments, if there're data fixtures, etc. This requires a lot more thought, and the goal of this article isn't something else.
2. Backend layer
This largely depends on the architecture, but in a simple 3-tier, the backend would be just another similar ECS service beside the front-end.
3. Complex code
With simple code and architecture it's easier to understand how the flow works, so adding complex code (or testing code) is not necessary. For the same reason we'll not have a separate web server container or worry about database.
4. Branching strategy
While it's an important part of the pipeline, for this article I'll have only have 1 branch (main).
In an ideal scenario you would want to have multiple branches associated with multiple environments, say "feature branches", "staging", "preprod/UAT" and "production" as an example. Then each developer would create pull requests to one of the environment branches, get the code approved and merge the changes.
At release-time, you would tag a commit as a release (with the release number), and deploy that commit. We'll omit all these today, but will come back to it later.
1. The setup
AWS
Terraform template
In this section we need to have an example architecture, which in our case is:
1x ECR repository to store our docker images
1x ECS machine set up as a docker host for ECS (yes, in this guide we'll not use Fargate)
+ other parts within ECS: cluster, service, task (+ task definition)
+ AWS wiring, like permissions, auto-scaling, networking, etc.
This is boring to set up, so I show you with a Terraform template to speed this up. It'll create the necessary bits.
If you don't know how to run terraform, first you need to install AWS CLI. Here's a quick tutorial I found for that: https://medium.com/@simonazhangzy/installing-and-configuring-the-aws-cli-7d33796e4a7c
Then you can use Terraform : https://developer.hashicorp.com/terraform/tutorials/aws-get-started/infrastructure-as-code
networking.tf
resource "aws_vpc" "my_vpc" {
  cidr_block           = "10.0.0.0/16"
  enable_dns_support   = true
  enable_dns_hostnames = true
}

resource "aws_subnet" "public_subnet_1" {
  vpc_id                  = aws_vpc.my_vpc.id
  cidr_block              = "10.0.1.0/24"
  map_public_ip_on_launch = true
  availability_zone       = "us-east-1a"
}

resource "aws_subnet" "public_subnet_2" {
  vpc_id                  = aws_vpc.my_vpc.id
  cidr_block              = "10.0.4.0/24"
  map_public_ip_on_launch = true
  availability_zone       = "us-east-1b"
}

resource "aws_internet_gateway" "internet_gw" {
  vpc_id = aws_vpc.my_vpc.id
}

resource "aws_route_table" "public_route_table" {
  vpc_id = aws_vpc.my_vpc.id
  route {
    cidr_block = "0.0.0.0/0"
    gateway_id = aws_internet_gateway.internet_gw.id
  }
}

resource "aws_route_table_association" "public_subnet_association" {
  subnet_id      = aws_subnet.public_subnet_1.id
  route_table_id = aws_route_table.public_route_table.id
}

resource "aws_route_table_association" "public_subnet_2_association" {
  subnet_id      = aws_subnet.public_subnet_2.id
  route_table_id = aws_route_table.public_route_table.id
}

resource "aws_security_group" "allow_web" {
  vpc_id = aws_vpc.my_vpc.id

  egress {
    from_port   = 0
    to_port     = 0
    protocol    = "-1"
    cidr_blocks = ["0.0.0.0/0"]
  }

  ingress {
    from_port   = 80
    to_port     = 80
    protocol    = "tcp"
    cidr_blocks = ["0.0.0.0/0"]
  }
}
This will create a brand new VPC, along with 2 subnets, route tables, internet gateway.
variables.tf
data "aws_caller_identity" "current" {}

variable "ami_id" {
  description = "The AMI ID to use for EC2"
  type        = string
  default     = "ami-04d4dd7b34e293332"
}

variable "instance_type" {
  description = "The instance type of the EC2 instance"
  type        = string
  default     = "t3.medium"
}

variable "cluster_name" {
  description = "The name of the ECS cluster"
  type        = string
  default     = "cicd-cluster"
}
Here you can add your specific requirements for your EC2 host (for ECS), and the ECS cluster name. (we'll have a TF template for the cluster later on)
load_balancing.tf
resource "aws_lb" "alb1" {
  name               = "alb1"
  internal           = false
  load_balancer_type = "application"
  security_groups    = [aws_security_group.allow_web.id]
  subnets            = [aws_subnet.public_subnet_1.id, aws_subnet.public_subnet_2.id]
}

resource "aws_lb_target_group" "exampleTG" {
  name        = "exampleTG"
  port        = 80
  protocol    = "HTTP"
  target_type = "instance"
  vpc_id      = aws_vpc.my_vpc.id

  health_check {
    enabled = true
    path    = "/"
  }
}

resource "aws_lb_listener" "http_listener" {
  load_balancer_arn = aws_lb.alb1.arn
  port              = 80
  protocol          = "HTTP"

  default_action {
    type             = "forward"
    target_group_arn = aws_lb_target_group.exampleTG.arn
  }
}
Above will create you a load balancer and a target group.
Target Groups
As you see the above template includes a target group. You can do it manually as well as using terraform.
Once you have a load balancer, you would need to have a target group to direct traffic.
You can create the Target group on the console here:EC2 => Target groups => Create target group
A few things to watch out for :
target-type: instance (IP does not work for dynamic port mapping)
VPC: select your VPC, it'll default to......the default VPC 🙂
DO NOT assign any targets to the target group. Leave it empty and save it.
Bitbucket
Enable deployments for your repository in the "Deployments" section. For this you'll require 2FA to be set up.
Enable pipelines as well in the repository settings
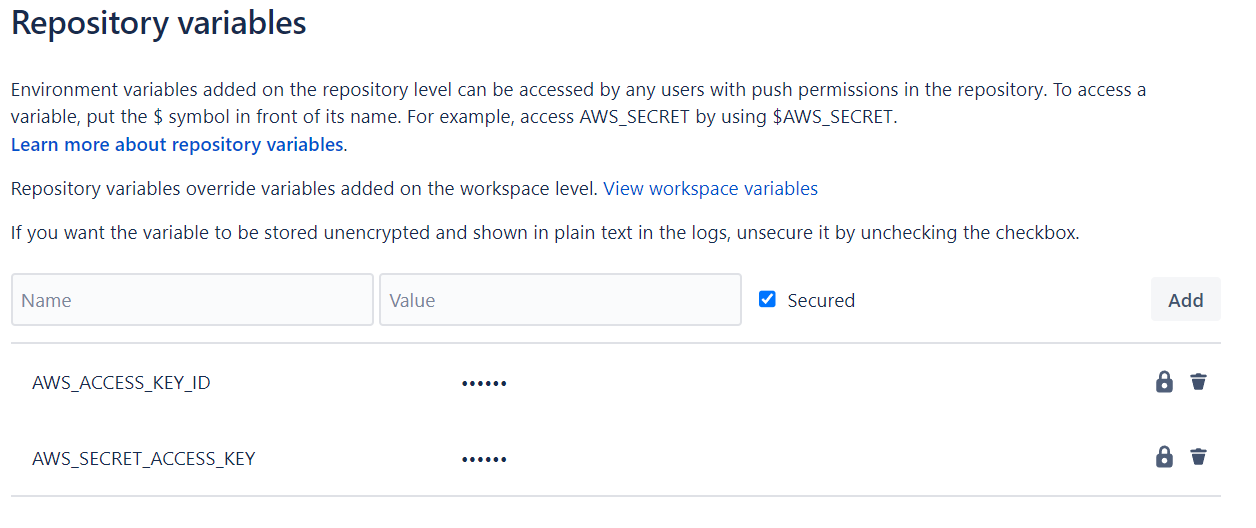
At the same place go to Repository Variables and add your AWS access keys:
2. Setting up the pipeline to run
dockerfile
In order to create a docker image on the pipeline, we need a docker file.
A very simple example for a react vite application could be this:
FROM node:20 as build
WORKDIR /app
COPY package*.json ./
RUN npm install
COPY . .
RUN npm run build

FROM nginx:stable-alpine
COPY --from=build /app/dist /usr/share/nginx/html
EXPOSE 80
CMD ["nginx", "-g", "daemon off;"]
bitbucket-pipelines.yml
Here's the example I've used.
image: node:20

options:
  docker: true

pipelines:
  branches:
    main:
      - step:
          name: Build and Push Docker Image
          script:
            # Install AWS CLI v2
            - echo " --> Installing AWS CLI..."
            - curl "https://awscli.amazonaws.com/awscli-exe-linux-x86_64.zip" --create-dirs -o "/tmp/awscli/awscliv2.zip"
            - unzip -qq /tmp/awscli/awscliv2.zip -d /tmp/
            - /tmp/aws/install

            # Login to Amazon ECR
            - echo " --> Logging into Amazon ECR..."
            - aws ecr get-login-password --region us-east-1 | docker login --username AWS --password-stdin 529768619555.dkr.ecr.us-east-1.amazonaws.com

            # Build Docker image with cache-from option and build arguments
            - echo " --> Building Docker image..."
            - docker build . --progress=plain --tag=cicd-example
            - docker images

            # Push the Docker image to Amazon ECR
            - echo " --> Pushing Docker image to Amazon ECR..."
            - pipe: atlassian/aws-ecr-push-image:1.5.0
              variables:
                AWS_ACCESS_KEY_ID: $AWS_ACCESS_KEY_ID
                AWS_SECRET_ACCESS_KEY: $AWS_SECRET_ACCESS_KEY
                AWS_DEFAULT_REGION: "us-east-1"
                IMAGE_NAME: "cicd-example"
                TAGS: "${BITBUCKET_BRANCH} ${BITBUCKET_COMMIT}"
Once you push this file up, a build will trigger.
You can see the description in the comments. The "pipe" section is something specific to bitbucket (bitbucket pipes), which are on their own little docker functions to do a specific task.
You can read about this particular here:
https://bitbucket.org/bitbucket/product/features/pipelines/integrations?search=ecr
Once this pipeline finishes, you should see something like this in ECR:
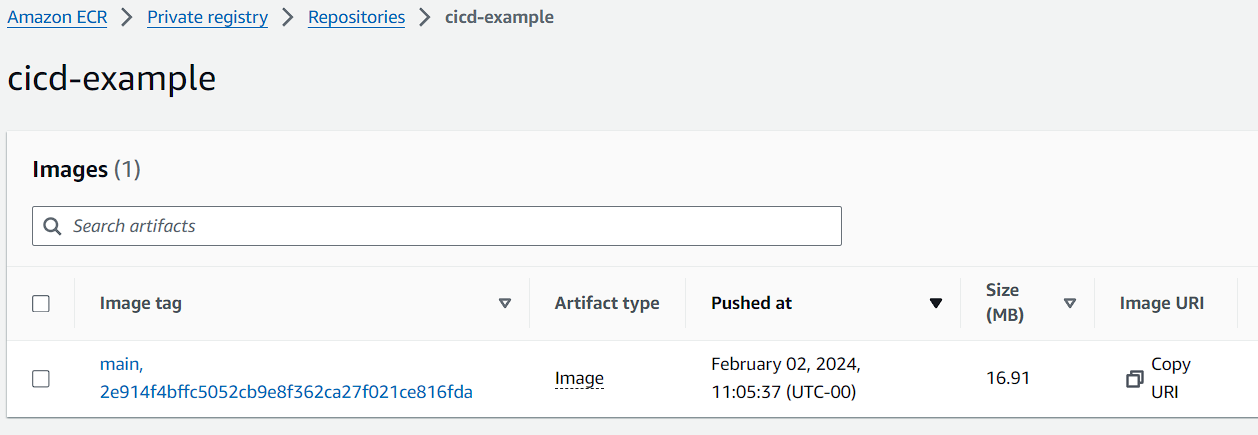
For now, we'll leave it at this.
In the next part we'll continue with ECS and EC2 setup. If you have any question feel free to contact me, happy to help!